
Introduction 介绍
You can create your own custom design tools inside Unity through Editor Windows. Scripts that derive from EditorWindow instead of MonoBehaviour can leverage both GUI/GUILayout and EditorGUI/EditorGUILayout controls. Alternatively, you can use Custom Inspectors to expose these GUI controls in your GameObject Inspector.
可以在Unity中通过编辑器窗口创建自定义设计工具。脚本从EditorWindow继承而不是MonoBehaviour,并能使用GUI/GUILayout中EditorGUI/EditorGUILayout的控件来定制。另一种方法,是你能在你的游戏对象监视器中使用自定义监视器显示这些GUI控件的属性。
Editor Windows 编辑器窗口
You can create any number of custom windows in your app. These behave just like the Inspector, Scene or any other built-in ones. This is a great way to add a user interface to a sub-system for your game.
你能够创建任意数量的自定义窗体。他们可以像检视面板,场景或者其他别的内建GUI一样工作。这是为你的游戏子系统创建用户界面的好方法。
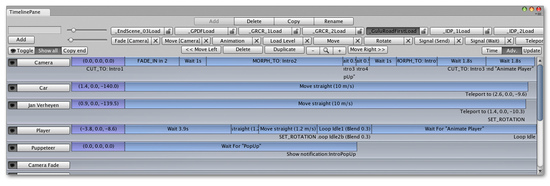
Custom Editor Interface by Serious Games Interactive used for scripting cutscene actions
用于游戏自定义交互动作的自定义编辑器界面
Making a custom Editor Window involves the following simple steps:
使用三个简单步骤来创建一个自定义编辑器窗口。
- Create a script that derives from EditorWindow.
创建一个从EditorWindow继承的脚本组件。 - Use code to trigger the window to display itself.
使用代码触发窗口显示自身。 - Implement the GUI code for your tool.
为你的工具功能实现GUI相关的代码。
Derive From EditorWindow 从EditorWindow继承
In order to make your Editor Window, your script must be stored inside a folder called "Editor". Make a class in this script that derives from EditorWindow. Then write your GUI controls in the inner OnGUI function.
为了创建你的编辑器窗口,你的脚本必须存储在名叫"Editor"的文件夹中。在这个脚本中创建一个从EditorWindow继承的类。然后再OnGUI函数中写你的GUI控件代码。
class MyWindow extends EditorWindow {
    function OnGUI () {
        // The actual window code goes here
    }
}
MyWindow.js - placed in a folder called 'Editor' within your project.
MyWindow.js文件放置在Editor文件夹
Showing the window 显示窗口
In order to show the window on screen, make a menu item that displays it. This is done by creating a function which is activated by the MenuItem property.
为了在屏幕中显示窗口,创建一个显示它的菜单项。你可以通过MenuItem属性来激活一个函数来完成这个过程。
The default behavior in Unity is to recycle windows (so selecting the menu item again would show existing windows. This is done by using the function EditorWindow.GetWindow Like this:
Unity缺省的行为是循环使用窗体(因此再次选择菜单会显示已经存在的窗体。这个功能是通过使用EditorWindow.GetWindow来实现的),如下
class MyWindow extends EditorWindow {
    @MenuItem ("Window/My Window")
    static function ShowWindow () {
        EditorWindow.GetWindow (MyWindow);
    }

    function OnGUI () {
        // The actual window code goes here
    }
}
Showing the MyWindow
This will create a standard, dockable editor window that saves its position between invocations, can be used in custom layouts, etc. To have more control over what gets created, you can use GetWindowWithRect
这会创建一个基础的,能自定义布局,可停驻的,并在使用间隙保持了自身位置的编辑器窗体。如果希望显示窗口能覆盖上一次已存在的设置,可以使用GetWindowWithRect实现。
Implementing Your Window's GUI 实现窗体GUI
The actual contents of the window are rendered by implementing the OnGUI function. You can use the same UnityGUI classes you use for your ingame GUI (GUI and GUILayout). In addition we provide some additional GUI controls, located in the editor-only classes EditorGUI and EditorGUILayout. These classes add to the controls already available in the normal classes, so you can mix and match at will.
窗体实际渲染的内容被实现在OnGUI函数中。你可以使用和你在游戏中使用的GUI控件(GUI和GUILayout)一样的UnityGUI类。Unity还额外提供了控件,这些控件包含在只读的EditorGUI类和EditorGUILayout类中。这些类增加到普通类中已经生效的控件集合中,因此你能完全可以混合使用它们。
For more info, take a look at the example and documentation on the EditorWindow page.
如想看更多的例子和文章,请查阅EditorWindow 页面.
Custom Inspectors 自定义检视面板
A key to increasing the speed of game creation is to create custom inspectors for commonly used components. For the sake of example, we'll use this very simple script that always keeps an object looking at a point.
加速游戏开发的关键是为公共使用的组件创建自定义的检查器。接下来的列子中,我们能看到一个非常简单的例子来使一个对象保持指向一个点的方向。
var lookAtPoint = Vector3.zero;

function Update () {
    transform.LookAt (lookAtPoint);
}
LookAtPoint.js
This will keep an object oriented towards a world-space point. Let's make it cool!
这将保持物体朝向世界的原点,让我们来让它变得酷点。
The first step to making it work nicely in the editor is to make the script run even when you're not testing the game. We do this by adding an ExecuteInEditMode attribute to it:
第一步,让它在编辑环境里工作的更好,使这个脚本在你没有开启游戏测试的时候也能运行。我们为脚本添加一个ExecuteInEditMode属性。
@script ExecuteInEditMode()

var lookAtPoint = Vector3.zero;

function Update () {
    transform.LookAt (lookAtPoint);
}
Try adding the script to your main camera and drag it around in the Scene view.
可以试着把这段脚本附加到你的主相机然后绕着场景视图拖拽它观察效果。
Making a Custom Editor 创建自定义的编辑器
This is all well and good, but we can make the inspector for it a lot nicer by customizing the inspector. To do that we need to create an Editor for it. Create a JavaScript called LookAtPointEditor in a folder called Editor.
Unity的功能都不错,但我们通过自定义监视器中的编辑器能让这一切变得更加美好。我们可以通过在Editor中创建名叫"LookAtPointEditor"的javascript脚本来实现。
@CustomEditor (LookAtPoint)
class LookAtPointEditor extends Editor {
    function OnInspectorGUI () {
        target.lookAtPoint = EditorGUILayout.Vector3Field ("Look At Point", target.lookAtPoint);
        if (GUI.changed)
            EditorUtility.SetDirty (target);
    }
}
This class has to derive from Editor. The @CustomEditor attribute informs Unity which component it should act as an editor for.
这个类继承至Editor. @CustomEditor属性告诉Unity这个组件能扮演编辑器的功能。
The code in OnInspectorGUI is exectued whenever Unity displays the inspector. You can put any GUI code in here - it works just like OnGUI does for games, but is run inside the inspector. Editor defines the target property that you can use to access the object being inspected.
Unity显示检查器的时候被执行组件里OnInspectorGUI()中的代码。你能在这个函数放置更多的代码,- 它工作起来更像OnGUI在游戏中完成的一样,但它确实工作在编辑模式中。编辑器定义了你能用来访问被检查的对象的target属性。
The EditorUtility.SetDirty code is executed if the user has changed any of the values by checking GUI.changed.
我们可以通过检查GUI.changed知道用户是否改变了任何数值,然后EditorUtility.SetDirty将被执行。
In this case, we make one of the Vector3 fields like is used in the Transform Inspector - like so:
使用这种方式,我们在Transform Inspector中创建了一个Vector3 fields
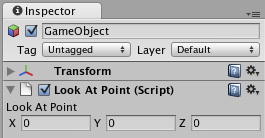
Yay for shiny inspectors 欢呼,万岁
There's a lot more that can be done here, but this will do for now - We've got bigger fish to fry...
还有更多可以改进的,但先这样吧,我们还有更重要的事情要做。
Scene View Additions 场景视图扩展
You can add extra code to the Scene View by implementing an OnSceneGUI in your custom editor. In this case, we'll add a second set of position handles, letting users drag the look-at point around in the Scene view.
你可以通过在你的自定义编辑器中实现OnSceneGUI来实现将扩展代码注入到场景视图,我们可以添加第二个位置手柄,让用户可以在场景视图中通过拖拽修改上例中的观察点。
@CustomEditor (LookAtPoint)
class LookAtPointEditor extends Editor {
    function OnInspectorGUI () {
        target.lookAtPoint = EditorGUILayout.Vector3Field ("Look At Point", target.lookAtPoint);
        if (GUI.changed)
            EditorUtility.SetDirty (target);
    }

    function OnSceneGUI () {
        target.lookAtPoint = Handles.PositionHandle (target.lookAtPoint, Quaternion.identity);
        if (GUI.changed)
            EditorUtility.SetDirty (target);
    }
}
OnSceneGUI works just like OnInspectorGUI - except it gets run in the scene view. To help you make your editing interface, you can use the functions defined in Handles class. All functions in there are designed for working in 3D Scene views.
OnSceneGUI会如同OnInspectorGUI一样工作 – 但它增加了能在场景视图中运行这个特性。你能使用定义在Handles类中的函数,这将帮助你定制你的编辑界面。所有定义在Handles的函数都被设计工作在3D场景视图中。
If you want to put 2D GUI objects (GUI, EditorGUI and friends), you need to wrap them in calls to Handles.BeginGUI() and Handles.EndGUI().
如果你想放置2D GUI控件(GUI, EditorGUI 或者其他),你需要将他们包裹在Handles.BeginGUI() 和 Handles.EndGUI()中。
页面最后更新于: 2010-07-19