
Fixed Layout vs Automatic Layout 固定布局 VS 自动布局
There are two different modes you can use to arrange and organize your GUIs: Fixed and Automatic. Up until now, every UnityGUI example provided in this guide has used Fixed Layout. To use Automatic Layout, write GUILayout instead of GUI when calling control functions. You do not have to use one Layout mode over the other, and you can use both modes at once in the same OnGUI() function.
在Unity中你可以使用固定布局和自动布局两种模式来排列和组织你的GUI控件。到现在为止,本指南中的UnityGUI例子中均使用固定布局。如果你想使用自动布局,你可以将GUI换成GUILayout来调用控件函数。在同一个OnGUI()函数中你可以同时使用两种模式工作。
Fixed Layout makes sense to use when you have a pre-designed interface to work from. Automatic Layout makes sense to use when you don't know how many elements you need up front, or don't want to worry about hand-positioning each Control. For example, if you are creating a number of different buttons based on Save Game files, you don't know exactly how many buttons will be drawn. In this case Automatic Layout might make more sense. It is really dependent on the design of your game and how you want to present your interface.
固定模式被使用在你拥有一个预先设计好的界面布局的情况下。而自动布局则被应用在你不太想参与每个控件的手动定位或者太多控件需要被有序安排而你应不暇接的情况下。例如,当你在编程时并不知道将会出现多少个按钮会出现在界面上的时候。自动布局能帮助你解决这个问题。当然,这些都取决于你游戏的设计和你对界面呈现的想法。
There are two key differences when using Automatic Layout:
在使用自动布局的时候和手动布局有两点关键的区别
- GUILayout is used instead of GUI 使用GUILayout而不是GUI
- No Rect() function is required for Automatic Layout Controls 自动布局控件并不需要你提供Rect()
/* Two key differences when using Automatic Layout */

function OnGUI () {
	// Fixed Layout
	//固定布局
	GUI.Button (Rect (25,25,100,30), "I am a Fixed Layout Button");

	// Automatic Layout
	//自动布局
	GUILayout.Button ("I am an Automatic Layout Button");
}
Arranging Controls 排列控件
Depending on which Layout Mode you're using, there are different hooks for controlling where your Controls are positioned and how they are grouped together. In Fixed Layout, you can put different Controls into Groups. In Automatic Layout, you can put different Controls into Areas, Horizontal Groups, and Vertical Groups
取决于你所使用的布局模式的不同,有多种不同的方式可以用来控制你控件定位的位置和他们如何分组。在固定布局中,你能将不同控件放进组。在自动布局中,你可以将不同控件放进区域,或者水平组,或者垂直组。
Fixed Layout - Groups 固定布局 – 组
Groups are a convention available in Fixed Layout Mode. They allow you to define areas of the screen that contain multiple Controls. You define which Controls are inside a Group by using the GUI.BeginGroup() and GUI.EndGroup() functions. All Controls inside a Group will be positioned based on the Group's top-left corner instead of the screen's top-left corner. This way, if you reposition the group at runtime, the relative positions of all Controls in the group will be maintained.
在固定布局模式下,组是一种允许你定义在某块屏幕区域中包含多个控件的方式。你可以通过使用GUI.BeginGroup()和GUI.EndGroup(()将控件包裹在组中。所有组中的控件将以组的左上边角而不是屏幕的左上边角进行定位。使用这种方法,当你手动定位移动组时,组内的所有控件也会关联的产生移动。
As an example, it's very easy to center multiple Controls on-screen.
如下的例子将向你展示,如何轻易的将多个控件定位到屏幕的中央
/* Center multiple Controls on the screen using Groups */

function OnGUI () {
	// Make a group on the center of the screen
	// 创建一个定位到屏幕中央的组
	GUI.BeginGroup (Rect (Screen.width / 2 - 50, Screen.height / 2 - 50, 100, 100));
	// All rectangles are now adjusted to the group. (0,0) is the topleft corner of the group.
	// 所有组内的控件以组为基准对齐。组的左上角坐标为(0,0)
	// We'll make a box so you can see where the group is on-screen.
	//现在我们在组内创建盒子控件
	GUI.Box (Rect (0,0,100,100), "Group is here");
	GUI.Button (Rect (10,40,80,30), "Click me");

	// End the group we started above. This is very important to remember!
	// 完成组的创建,这非常重要
	GUI.EndGroup ();
}
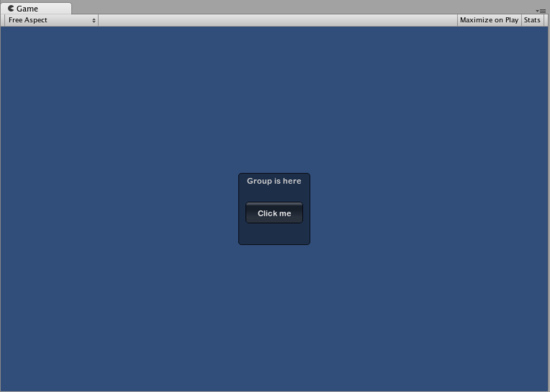
The above example centers controls regardless of the screen resolution
以上例中,所有控件无论什么屏幕分辨率都将置中
You can also nest multiple Groups inside each other. When you do this, each group has its contents clipped to its parent's space.
你还可以嵌套组的定义。这种情况下,每个嵌套的组都以上一级的组控件的可视区域剪裁自己的可视区域
/* Using multiple Groups to clip the displayed Contents */
/* 使用多个组剪裁可视的控件*/

var bgImage : Texture2D; // background image that is 256 x 32
// 大小为256*32的背景图片
var fgImage : Texture2D; // foreground image that is 256 x 32
// 大小为256*32的前景图片

var playerEnergy = 1.0; // a float between 0.0 and 1.0
// 一个0.0 到1.0之间的浮点量

function OnGUI () {
	// Create one Group to contain both images
	// 创建一个包含两个图片的组
	// Adjust the first 2 coordinates to place it somewhere else on-screen
	// 定义初始的位置到屏幕外
	GUI.BeginGroup (Rect (0,0,256,32));

	// Draw the background image
	// 显示背景图片
	GUI.Box (Rect (0,0,256,32), bgImage);

	// Create a second Group which will be clipped
	// 创建第二个被剪裁的组
	// We want to clip the image and not scale it, which is why we need the second Group
	// 我们想剪裁图片而不是对其进行缩放,这是我们采用第二个组的原因
	GUI.BeginGroup (Rect (0,0,playerEnergy * 256, 32));

	// Draw the foreground image
	// 画出前景图片
	GUI.Box (Rect (0,0,256,32), fgImage);


	// End both Groups
	// 结束组的定义
	GUI.EndGroup ();
	GUI.EndGroup ();
}
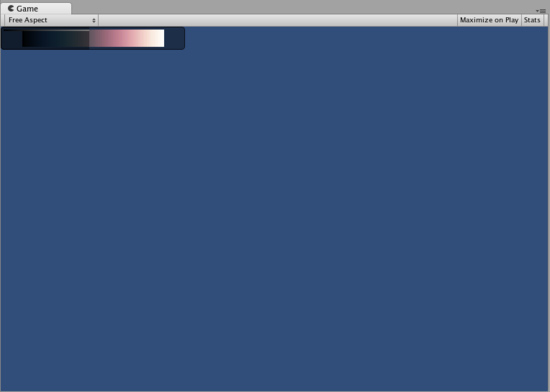
You can nest Groups together to create clipping behaviors
你可以通过使用组创造剪裁的效果
Automatic Layout - Areas 自动布局 – 区域
Areas are used in Automatic Layout mode only. They are similar to Fixed Layout Groups in functionality, as they define a finite portion of the screen to contain GUILayout Controls. Because of the nature of Automatic Layout, you will nearly always use Areas.
区域只使用在自动布局模式中。在编程结构上和固定布局模式中的组非常相近,区域同样是在屏幕的限定区域显示GUILayout控件。由于自动布局的本质,使用区域非常频繁。
In Automatic Layout mode, you do not define the area of the screen where the Control will be drawn at the Control level. The Control will automatically be placed at the upper-leftmost point of its containing area. This might be the screen. You can also create manually-positioned Areas. GUILayout Controls inside an area will be placed at the upper-leftmost point of that area.
在自动布局模式下,你不需要在控件级别设定控件所处的屏幕区域,控件会自动根据包含它的控件的左上角定位自身位置,当然你仍然需要手动定位区域。区域内GUILayout控件会自动以区域的左上角定位。
/* A button placed in no area, and a button placed in an area halfway across the screen. */
/* 一个未放置于区域内的按钮和一个放置于以屏幕中心为左上角坐标的区域中的按钮 */

function OnGUI () {
	GUILayout.Button ("I am not inside an Area");
	GUILayout.BeginArea (Rect (Screen.width/2, Screen.height/2, 300, 300));
	GUILayout.Button ("I am completely inside an Area");
	GUILayout.EndArea ();
}
Notice that inside an Area, Controls with visible elements like Buttons and Boxes will stretch their width to the full length of the Area.
我们可以发现在区域中,按钮控件和盒子控件会将它们的宽度伸展到和区域宽度一样宽
Automatic Layout - Horizontal and Vertical Groups 自动布局 – 水平组和垂直组
When using Automatic Layout, Controls will by default appear one after another from top to bottom. There are plenty of occasions you will want finer level of control over where your Controls are placed and how they are arranged. If you are using the Automatic Layout mode, you have the option of Horizontal and Vertical Groups.
当你使用自动布局模式时,缺省情况下控件会从上到下一个接一个的显示。在很多场合下,你会希望控件如果能水平放置会更好控制。在自动布局模式中,你可以采用水平组合垂直组进行控制。
Like the other layout Controls, you call separate functions to start or end these groups. The specific functions are
和其他布局控件相似,你需要通过分离的调用开始函数和结束函数来创建组,这些函数如下。
GUILayout.BeginHoriztontal(), GUILayout.EndHorizontal(), GUILayout.BeginVertical(), and GUILayout.EndVertical()
Any Controls inside a Horizontal Group will always be laid out horizontally. Any Controls inside a Vertical Group will always be laid out vertically. This sounds plain until you start nesting groups inside each other. This allows you to arrange any number of controls in any imaginable configuration.
水平组的控件始终是水平放置。垂直组的控件则始终保持垂直。直到你添加新的组来引入改变,通过嵌套模式你可以尽可能发挥你的想象力来达到你的预期目标
/* Using nested Horizontal and Vertical Groups */
/* 使用嵌套的水平组合垂直组 */

var sliderValue = 1.0;
var maxSliderValue = 10.0;

function OnGUI()
{
	// Wrap everything in the designated GUI Area
	// 在指定的区域中包裹控件
	GUILayout.BeginArea (Rect (0,0,200,60));

	// Begin the singular Horizontal Group
	// 开始单行的水平组
	GUILayout.BeginHorizontal();

	// Place a Button normally
	// 放置一个重复按钮
	if (GUILayout.RepeatButton ("Increase max\nSlider Value"))
	{
		maxSliderValue += 3.0 * Time.deltaTime;
	}

	// Arrange two more Controls vertically beside the Button
	// 在前一个按钮旁边垂直排列两个或更多控件
	GUILayout.BeginVertical();
	GUILayout.Box("Slider Value: " + Mathf.Round(sliderValue));
	sliderValue = GUILayout.HorizontalSlider (sliderValue, 0.0, maxSliderValue);

	// End the Groups and Area
	GUILayout.EndVertical();
	GUILayout.EndHorizontal();
	GUILayout.EndArea();
}
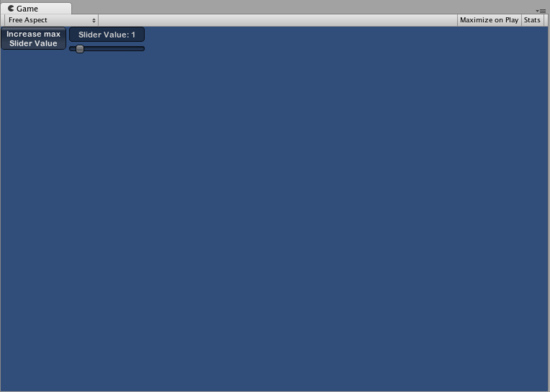
Three Controls arranged with Horizontal & Vertical Groups
通过水平组和垂直组排列的三个控件
Using GUILayoutOptions to define some controls
使用GUILayoutOptions定位控件
You can use GUILayoutOptions to override some of the Automatic Layout parameters. You do this by providing the options as the final parameters of the GUILayout Control.
你能通过使用GUILayoutOptions覆盖自动布局模式的默认参数为GUILayout控件提供最终使用的参数。
Remember in the Areas example above, where the button stretches its width to 100% of the Area width? We can override that if we want to.
让我们回想一下上面区域的例子,按钮的宽度扩展到了区域的宽度,我们可以通过GUILayoutOptions修改这种行为。
/* Using GUILayoutOptions to override Automatic Layout Control properties */

function OnGUI () {
	GUILayout.BeginArea (Rect (100, 50, Screen.width-200, Screen.height-100));
	GUILayout.Button ("I am a regular Automatic Layout Button");
	GUILayout.Button ("My width has been overridden", GUILayout.Width (95));
	GUILayout.EndArea ();
}
For a full list of possible GUILayoutOptions, please read the GUILayoutOption Scripting Reference page.
想了解GUILayoutOptions的完整信息,请查阅GUILayoutOption Scripting Reference page.