
Just as cameras are used in films to display the story to the audience, Cameras in Unity are used to display the game world to the player. You will always have at least one camera in a scene, but you can have more than one. Multiple cameras can give you a two-player splitscreen or create advanced custom effects. You can animate cameras, or control them with physics. Practically anything you can imagine is possible with cameras, and you can use typical or unique cameras to fit your game's style.
正如电影中的镜头用来将故事呈现给观众一样,Unity的相机用来将游戏世界呈现给玩家。你始终至少有一个相机在场景中,你也可以有多个。多相机可以给你一个双人分屏效果或创建高级的自定义效果。你可以让相机动起来,或用物理(组件)控制它们。几乎你能想到的任何事,都可以用相机变成可能,而且为了适合你的游戏风格,你可以用典型的或特殊的相机类型。
The remaining text is from the Camera Component reference page.
下面的文字来自于Camera Component reference
Camera 摄像机
Cameras are the devices that capture and display the world to the player. By customizing and manipulating cameras, you can make the presentation of your game truly unique. You can have an unlimited number of cameras in a scene. They can be set to render in any order, at any place on the screen, or only certain parts of the screen.
相机是为玩家捕捉和显示世界的一种装置。通过定制和操作相机,可以让你的游戏外观与众不同。在一个场景中你可以有数量不限的相机。它们可以被设置为以任何顺序来渲染,在屏幕上的任何地方来渲染,或仅仅渲染屏幕的一部分。
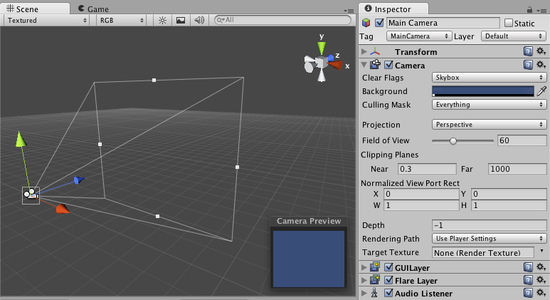
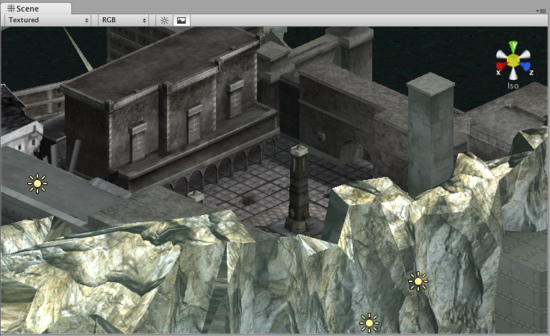
Unity's flexible Camera object 可调整相机对象
Properties 属性
-
Clear Flags 清除标记Determines which parts of the screen will be cleared. This is handy when using multiple Cameras to draw different game elements.
决定屏幕的哪部分将被清除。当使用多个相机来描绘不同的游戏景象时,利用它是非常方便的 -
Background 背景Color applied to the remaining screen after all elements in view have been drawn and there is no skybox.
在镜头中的所有元素描绘完成且没有天空盒的情况下,将选中的颜色应用到剩余的屏幕 -
Culling Mask 剔除遮罩Include or omit layers of objects to be rendered by the Camera. Assign layers to your objects in the Inspector.
包含或忽略对象的层由相机来渲染。在检视视图中为你的对象指派层 -
Projection 投射Toggles the camera's capability to simulate perspective.
切换摄像机的模拟透视功能 -
Perspective 透视Camera will render objects with perspective intact.
相机将用完全透视的方式来渲染对象。 -
Orthographic 正交Camera will render objects uniformly, with no sense of perspective.
相机将用没有透视感的方式均匀地渲染对象 -
Size 大小
(when Orthographic is selected)The viewport size of the Camera when set to Orthographic.
当设置了正交时摄像机的视口大小。 -
Field of view 视野范围Width of the Camera's view angle, measured in degrees along the local Y axis.
相机的视角宽度,以及纵向的角度尺寸。 -
Clipping Planes 剪裁平面Distances from the camera to start and stop rendering.
从相机到开始渲染和停止渲染之间的距离。 -
Near 近点The closest point relative to the camera that drawing will occur.
开始描绘的相对于相机最近的点。 -
Far 远点The furthest point relative to the camera that drawing will occur.
开始描绘的相对于相机最远的点。 -
Normalized View Port Rect
标准视口矩形Four values that indicate where on the screen this camera view will be drawn, in Screen Coordinates (values 0-1).
用四个数值来表示这个相机的视图将绘制在屏幕的什么地方,使用屏幕坐标系(值0-1)。 - XThe beginning horizontal position that the camera view will be drawn.
相机视图将进行绘制的水平位置的起点 - YThe beginning vertical position that the camera view will be drawn.
相机视图将进行绘制的垂直位置的起点 -
W (Width) 宽度Width of the camera output on the screen. 相机输出到屏幕上的宽度
-
H (Height) 高度Height of the camera output on the screen. 相机输出到屏幕上的高度
-
Depth 深度The camera's position in the draw order. Cameras with a larger value will be drawn on top of cameras with a smaller value.
绘图顺序中的相机位置,具有较大值的相机将被绘制在具有较小值的相机的上面 -
Rendering Path
渲染路径Options for defining what rendering methods will be used by the camera.
该选项定义相机将要使用的渲染方法 -
Use Player Settings
使用播放器设置This camera will use whichever Rendering Path is set in the Player Settings.
该相机将使用任意一个播放器设置中所设置的渲染路径 -
Vertex Lit 顶点光照All objects rendered by this camera will be rendered as Vertex-Lit objects.
本相机对所有对象的渲染会作为顶点光照对象来渲染 -
Forward 快速渲染All objects will be rendered with one pass per material, as was standard in Unity 2.x.
所有对象将按每种材质一个通道的方式来渲染,如同在Unity2.x中的标准 -
Deferred Lighting 延迟照明
(Unity Pro only)All objects will be drawn once without lighting, then lighting of all objects will be rendered together at the end of the render queue.
所有对象将无照明绘制一次,然后所有对象的照明将一起在渲染队列的末尾被渲染。 -
Target Texture 目标纹理
(Unity Pro/Advanced only)Reference to a Render Texture that will contain the output of the Camera view. Making this reference will disable this Camera's capability to render to the screen.
请参考Render Texture,该页包含了相机视图的输出。这个引用属性将禁用相机渲染到屏幕的功能。
Details 细节
Cameras are essential for displaying your game to the player. They can be customized, scripted, or parented to achieve just about any kind of effect imaginable. For a puzzle game, you might keep the Camera static for a full view of the puzzle. For a first-person shooter, you would parent the Camera to the player character, and place it at the character's eye level. For a racing game, you'd likely want to have the Camera follow your player's vehicle.
相机对于将你的游戏显示给玩家是必不可少的。它们可以被定制、被脚本化、或被父子化(不好翻译,只好这样)以实现几乎任何可以想象的效果。对于一个益智游戏,你要保持相机处于静态显示全部视角。对于第一人称射击游戏,你应该将相机作为玩家角色的子对象,并将其放置在与角色的眼睛等高水平上。对于一个赛车游戏,你可能更希望让相机跟随玩家的车辆。
You can create multiple Cameras and assign each one to a different Depth. Cameras are drawn from low Depth to high Depth. In other words, a Camera with a Depth of 2 will be drawn on top of a Camera with a depth of 1. You can adjust the values of the Normalized View Port Rectangle property to resize and position the Camera's view onscreen. This can create multiple mini-views like missile cams, map views, rear-view mirrors, etc.
你可以创建多个相机并且给每一个分配不同的深度。相机是按深度从低到高来绘制的,换言之,一个深度为2的相机将绘制在一个深度为1的相机之上。你可以调整标准视口矩形(参照前面的属性列表)的属性值来改变其大小和其在屏幕上的位置。这样你就可以创建多个小视窗,如导弹控制器,小地图窗口,后视镜等等。
Render Path 渲染路径
Unity supports different Rendering Paths. You should choose which one you use depending on your game content and target platform / hardware. Different rendering paths have different features and performance characteristics that mostly affect Lights and Shadows.
The rendering Path used by your project is chosen in Player Settings. Additionally, you can override it for each Camera.
Unity支持不同的渲染路径。你应该选择哪一个取决于你的游戏内容和目标平台/硬件。不同的渲染路径有不同的功能和性能特点,主要影响光源与阴影。你的项目使用的渲染路径是在播放设置中选择的,此外,你可以为每个相机覆盖它(就是重新选择一种渲染方式)。
For more info on rendering paths, check the rendering paths page.
更多渲染路径的信息,请查看rendering paths page。
Clear Flags 清除标记
Each Camera stores color and depth information when it renders its view. The portions of the screen that are not drawn in are empty, and will display the skybox by default. When you are using multiple Cameras, each one stores its own color and depth information in buffers, accumulating more data as each Camera renders. As any particular Camera in your scene renders its view, you can set the Clear Flags to clear different collections of the buffer information. This is done by choosing one of the four options:
每个相机在渲染时会存储颜色和深度信息。屏幕的未绘制部分是空的,默认情况下会显示天空盒。当你使用多个相机时,每一个都将自己的颜色和深度信息存储在缓冲区中,还将积累大量的每个相机的渲染数据。当场景中的任何特定相机进行渲染时,你可以设定清除标记以清除缓冲区信息的不同集合。可以通过下面四个选项之一来完成:
Skybox 天空盒
This is the default setting. Any empty portions of the screen will display the current Camera's skybox. If the current Camera has no skybox set, it will default to the skybox chosen in the Render Settings (found in Edit->Render Settings). It will then fall back to the Background Color. Alternatively a Skybox component can be added to the camera. If you want to create a new Skybox, you can use this guide.
这是默认设置。在屏幕上空的部分将显示当前相机的天空盒。如果当前相机没有设置天空盒,它会默认使用渲染设置(在Edit->Render Settings里)中选择的天空盒。然后它将退回使用背景颜色。
Solid Color 纯色
Any empty portions of the screen will display the current Camera's Background Color.
屏幕上的任何空的部分将显示当前相机的背景颜色。
Depth Only 仅深度
If you wanted to draw a player's gun without letting it get clipped inside the environment, you would set one Camera at Depth 0 to draw the environment, and another Camera at Depth 1 to draw the weapon alone. The weapon Camera's Clear Flags should be set to to depth only. This will keep the graphical display of the environment on the screen, but discard all information about where each object exists in 3-D space. When the gun is drawn, the opaque parts will completely cover anything drawn, regardless of how close the gun is to the wall.
如果你想绘制一个玩家的枪而不让它在环境内部得到裁剪,你要设置一个深度为0的相机来绘制环境,还要另一个深度为1的相机单独绘制武器。该武器相机的清除标记应设置为仅深度。这将保持环境的图形显示在屏幕上,但会丢弃所有关于每个对象在三维空间中的位置的信息。当枪被绘制出来,不透明的部分将完全覆盖任何已绘制的事物,而不管枪到墙之间如何接近。(这部分看起来很费劲)
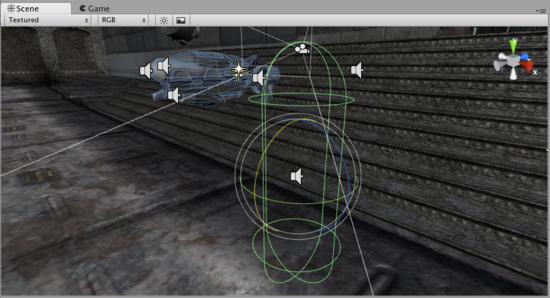
The gun is drawn last, after clearing the depth buffer of the cameras before it
在清除掉它前面的相机的深度缓存之后,枪最后被绘制
Don't Clear 不清除
This mode does not clear either the color or the depth buffer. The result is that each frame is drawn over the next, resulting in a smear-looking effect. This isn't typically used in games, and would likely be best used with a custom shader.
该模式不清除任何颜色或深度缓存。其结果是,每帧绘制在下一帧之上,造成涂片效果。这不是用于游戏的典型方式,最好是与自定义着色器一起使用。
Clip Planes 剪裁平面
The Near and Far Clip Plane properties determine where the Camera's view begins and ends. The planes are laid out perpendicular to the Camera's direction and are measured from the its position. The Near plane is the closest location that will be rendered, and the Far plane is the furthest.
Near和Far,剪裁平面的这两个属性决定了相机的视野开始和结束的地方。这两个平面垂直于相机的方向,并且由相机的位置来确定。近平面是开始渲染的最近位置,远平面则是最远位置。
The clipping planes also determine how depth buffer precision is distributed over the scene. In general, to get better precision you should move the Near plane as far as possible.
剪裁平面也决定深度缓存精度如何在场景上分布。一般来说,要得到更好的精度你应该移动Near平面尽可能的远。
Note that the near and far clip planes together with the planes defined by the field of view of the camera describe what is popularly known as the camera frustum. Unity ensures that when rendering your objects those which are completely outside of this frustum are not displayed. This is called Frustum Culling. Frustum Culling happens irrespective of whether you use Occlusion Culling in your game.
注意,Near和Far剪裁平面连同相机视野的轮廓平面一起构成的区域俗称相机锥(这种形状应该叫作棱台吧)。Unity确保在渲染你的对象时,那些完全在这个锥形区域外的对象则不显示。这就是所谓的可视性剪裁。不论你的游戏是否使用遮挡剔除,可视性剪裁都将发生。
For performance reasons, you might want to cull small objects earlier. For example, small rocks and debris could be made invisible at much smaller distance than large buildings. To do that, put small objects into a separate layer and setup per-layer cull distances using Camera.layerCullDistances script function.
出于性能原因,你可能需要尽早剔除小物体。例如,小石块和碎片相对于大型建筑会在更短距离内不可见。要做到这一点,将小物体放入一个隔离层(separate layer)并使用Camera.layerCullDistances脚本函数设置每一层的剔除距离。
Culling Mask 剔除遮罩
The Culling Mask is used for selectively rendering groups of objects using Layers. More information on using layers can be found here.
剔除遮罩使用层有选择地渲染一组对象。有关使用层的信息可以在这里找到。
Commonly, it is good practice to put your User Interface on a different layer, then render it by itself with a separate Camera set to render the UI layer by itself.
通常好的做法,是把用户界面放到不同的层,然后用一个独立相机单独渲染UI层。
In order for the UI to display on top of the other Camera views, you'll also need to set the Clear Flags to Depth only and make sure that the UI Camera's Depth is higher than the other Cameras.
为了使UI显示在其他相机视角的顶部,你还需要设置清除标记为Depth only,并确保UI相机的深度比其他相机高。
Normalized Viewport Rectangle 标准视口矩形
Normalized Viewport Rectangles are specifically for defining a certain portion of the screen that the current camera view will be drawn upon. You can put a map view in the lower-right hand corner of the screen, or a missile-tip view in the upper-left corner. With a bit of design work, you can use Viewport Rectangle to create some unique behaviors.
标准视口矩形是专门用来定义当前相机的视点将显示在屏幕的哪一部分。你可以把地图视角(意思就是小地图)放在屏幕右下角,或把导弹尖视角(可以理解为发射瞄准镜)放到左上角。只需一点设计工作,你就可以用视口矩形创造出一些独特的行为。
It's easy to create a two-player split screen effect using Normalized Viewport Rectangle. After you have created your two cameras, change both camera H value to be 0.5 then set player one's Y value to 0.5, and player two's Y value to 0. This will make player one's camera display from halfway up the screen to the top, and player two's camera will start at the bottom and stop halfway up the screen.
使用标准视口矩形可以很容易地创建一个双人分屏效果。在你创建了两个相机之后,改变玩家1的Ymin值为0.5,玩家2的YMax值为0.5。这将使玩家1的相机显示在屏幕的上半部分,玩家2的相机显示在屏幕下半部分。(Ymin、Ymax应该是旧版本的参数吧,3.1版的参数见前面列表)
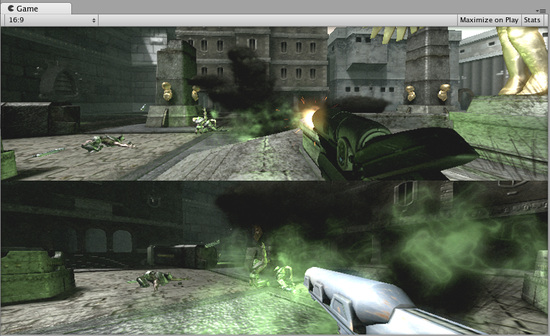
Two-player display created with Normalized Viewport Rectangle
使用标准视口矩形创建的双人分屏
Orthographic 正交
Marking a Camera as Orthographic removes all perspective from the Camera's view. This is mostly useful for making isometric or 2D games.
用正交标记一个相机将从相机视角中移除透视效果,这主要用于等轴游戏或2D游戏。
Note that fog is rendered uniformly in orthographic camera mode and may therefore not appear as expected. Read more about why in the component reference on Render Settings.
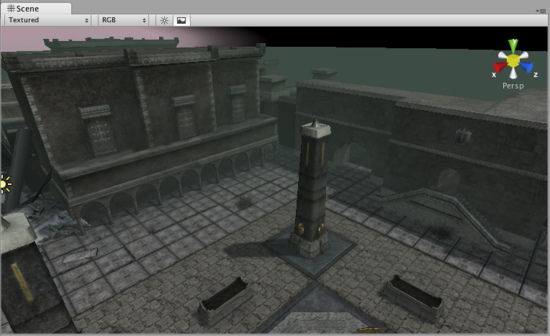
Perspective camera. 透视相机
Orthographic camera. Objects do not get smaller with distance here!
正交相机,对象不会因距离远而变小
Render Texture 渲染纹理
This feature is only available for Unity Advanced licenses . It will place the camera's view onto a Texture that can then be applied to another object. This makes it easy to create sports arena video monitors, surveillance cameras, reflections etc.
此功能仅适用于Unity Pro版,它将放置相机的视图到一个纹理上,该纹理可以被应用到另一个对象。这使得它可以方便地创建体育场大屏幕、监控摄像机、倒影等等效果。

A Render Texture used to create a live arena-cam
渲染纹理用来创建一个直播监视器
Hints 提示
- Cameras can be instantiated, parented, and scripted just like any other GameObject.
相机可以像其他对象一样被实例化、父子化和脚本化 - To increase the sense of speed in a racing game, use a high Field of View.
为提高赛车游戏的速度感,请使用高视野范围。 - Cameras can be used in physics simulation if you add a Rigidbody Component.
如果你添加一个刚体组件,相机可用于物理模拟。 - There is no limit to the number of Cameras you can have in your scenes.
在你的场景中你可以使用的相机数量是没有限制的。 - Orthographic cameras are great for making 3D user interfaces
正交相机可以很好地用于制作3D用户界面。 - If you are experiencing depth artifacts (surfaces close to each other flickering), try setting Near Plane to as large as possible.
如果你正遭遇深度问题(表面互相接近闪烁),尝试设置Near Plane尽可能大。 - Cameras cannot render to the Game Screen and a Render Texture at the same time, only one or the other.
相机无法同时渲染到屏幕和渲染纹理,只能有一个。 - Pro license holders have the option of rendering a Camera's view to a texture, called Render-to-Texture, for even more unique effects.
Pro版有一个渲染相机的视图到纹理的选项,称为渲染到纹理,可以得到更独特效果。 - Unity comes with pre-installed Camera scripts, found in Components->Camera Control. Experiment with them to get a taste of what's possible.
Unity预装了相机脚本,在Components->Camera Control中可以找到。用它们来实验以体会"一切皆有可能"。