
回复:谢谢,已修正。
By this point you should understand the concept of Prefabs at a fundamental level. They are a collection of predefined GameObjects & Components that are re-usable throughout your game. If you don't know what a Prefab is, we recommend you read the Prefabs page for a more basic introduction.
从这里了解预置物体概念。他们是预先定义好的游戏物体和组件的集合,可以在游戏中重复使用。如果你不了解预置(Prefabs)是什么,参见Prefabs页面了解更多基本介绍。
Prefabs come in very handy when you want to instantiate complicated GameObjects at runtime. The alternative to instantiating Prefabs is to create GameObjects from scratch using code. Instantiating Prefabs has many advantages over the alternative approach:
在运行时,通过Prefabs预置实例化复杂的游戏物体是非常方便的。可以通过代码实例预置来创建游戏物体。用实例预置方法的优势:
- You can instantiate a Prefab from one line of code, with complete functionality. Creating equivalent GameObjects from code takes an average of five lines of code, but likely more.
可以一行代码实例一个预置物体,具有全部相同的功能。创建等效游戏物体,平均需要5行代码,但可能更多。 - You can set up, test, and modify the Prefab quickly and easily in the Scene and Inspector.
可以很容易在场景和检视面板,快速设置、测试和修改预置物体。 - You can change the Prefab being instanced without changing the code that instantiates it. A simple rocket might be altered into a super-charged rocket, and no code changes are required.
可以修改被实例化的预置物体,不需要改变实例化代码。如,一个简单的火箭可能改变成一个超级火箭,并不必须改变代码。
Common Scenarios 一般情况
To illustrate the strength of Prefabs, let's consider some basic situations where they would come in handy:
为了说明预置的强大,让我们来看看一些常用的情况:
- Building a wall out of a single "brick" Prefab by creating it several times in different positions.
在不同的位置,多次使用一块砖来砌一堵墙。 - A rocket launcher instantiates a flying rocket Prefab when fired. The Prefab contains a Mesh, Rigidbody, Collider, and a child GameObject with its own trail Particle System.
当发射时,火箭发射器实例一个飞行的火箭预置。该预置物体包含一个网格、刚体、碰撞器和一个子游戏物体带有它自己的粒子系统拖尾。 - A robot exploding to many pieces. The complete, operational robot is destroyed and replaced with a wrecked robot Prefab. This Prefab would consist of the robot split into many parts, all set up with Rigidbodies and Particle Systems of their own. This technique allows you to blow up a robot into many pieces, with just one line of code, replacing one object with a Prefab.
一个机器人爆炸成许多碎片。最终,操作的机器人被毁坏,替并换一个毁坏的机器人预制。这个预置包含机器人分裂的多个部分,所有设置带有它们自己的刚体和粒子系统。这种技术可以让你炸毁一个机器人为很多碎片,仅用一行代码,用于在替换其中的物体。
Building a wall 构建一堵墙
This explanation will illustrate the advantages of using a Prefab vs creating objects from code.
这个例子说明使用预制的优势,针对使用代码创建物体。
First, lets build a brick wall from code:
首先,使用代码创建一堵砖墙:
function Start () {
    for (var y = 0; y < 5; y++) {
        for (var x = 0; x < 5; x++) {
            var cube = GameObject.CreatePrimitive(PrimitiveType.Cube);
            cube.AddComponent(Rigidbody);
            cube.transform.position = Vector3 (x, y, 0);
        }
    }
}
- To use the above script we simply save the script and drag it onto an empty GameObject.
使用上面的脚本,保存脚本并拖拽它到一个空的游戏物体上。 - Create an empty GameObject with GameObject->Create Empty.
GameObject->Create Empty 创建一个空的游戏物体。
If you execute that code, you will see an entire brick wall is created when you enter Play Mode. There are two lines relevant to the functionality of each individual brick: the CreatePrimitive() line, and the AddComponent() line. Not so bad right now, but each of our bricks is un-textured. Every additional action to want to perform on the brick, like changing the texture, the friction, or the Rigidbody mass, is an extra line.
当进入播放模式,执行代码后,将会看到创建的整个砖墙。有两条与功能相关的重要语句,CreatePrimitive()和AddComponent(),现在没有那么糟糕,只是每个砖块没有纹理。每个想在砖块上执行的附加行为,如,改变纹理、摩擦力或刚体的质量,都是额外的语句。
If you create a Prefab and perform all your setup before-hand, you use one line of code to perform the creation and setup of each brick. This relieves you from maintaining and changing a lot of code when you decide you want to make changes. With a Prefab, you just make your changes and Play. No code alterations required.
如果你创建一个预置物体,在执行前都设置好,使用一行代码就可执行创建和设置每一块砖。在需要修改时,可以较少维护和修改和多代码。只需要修改预置即可,不需修改代码。
If you're using a Prefab for each individual brick, this is the code you need to create the wall.
如果你使用预置物体代替每一块砖,下面是创建墙的代码。
var cube : Transform;
function Start () {
    for (var y = 0; y < 5; y++) {
        for (var x = 0; x < 5; x++) {
            var cube = Instantiate(cube, Vector3 (x, y, 0), Quaternion.identity);
        }
    }
}
This is not only very clean but also very reusable. There is nothing saying we are instantiating a cube or that it must contain a rigidbody. All of this is defined in the Prefab and can be quickly created in the Editor.
代码不仅非常干净,但也可重复使用。没有什么说我们实例化一个立方体,它必须包含刚体。所有这一切都是在预制定义的并且可以快速在编辑器修改。
Now we only need to create the Prefab, which we do in the Editor. Here's how:
现在我们只需要在编辑器创建预置物体,方法如下:
- Choose GameObject->Create Other->Cube
创建立方体 - Choose Component->Physics->Rigidbody
附加刚体 - Choose Assets->Create Prefab
创建预置物体 - In the Project View, change the name of your new Prefab to "Brick"
在项目视图,改变新建的预置为"Brick" - Drag the cube you created in the Hierarchy onto the "Brick" Prefab in the Project View
在层级面板拖拽刚才新建的立方体到项目视图中"Brick"预置物体上 - With the Prefab created, you can safely delete the Cube from the Hierarchy (Delete on Windows, Command-Backspace on Mac)
在创建预置物体后,你可以从层级面板安全删除立方体(在Windows是Delete键,在Mac是Command-Backspace键)
We've created our Brick Prefab, so now we have to attach it to the cube variable in our script. Select the empty GameObject that contains the script. Notice that a new variable has appeared in the Inspector, called "cube".
我们已经创建了Brick预置,现在我们附加它到脚本的变量上。选择空游戏物体附加这个脚本。注意,在检视面板将显示一个新的变量,名为cube。
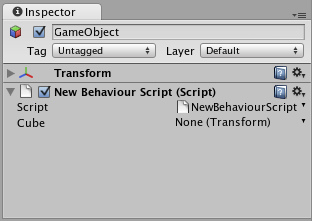
This variable can accept any GameObject or Prefab 这个变量可以接受任意游戏物体或预置
Now drag the "Brick" Prefab from the Project View onto the cube variable in the Inspector. Press Play and you'll see the wall built using the Prefab.
现在从项目视图拖拽"Brick"预置到检视面板的cube变量上。按下Play,将会看到使用预置建立的墙。
This is a workflow pattern that can be used over and over again in Unity. In the beginning you might wonder why this is so much better, because the script creating the cube from code is only 2 lines longer.
这是的基本工作流程,在Unity可以重复使用。在刚开始,你可能不知道为什么这么方便,因为脚本创建立方体,仅需要2行代码。
But because you are using a Prefab now, you can adjust the Prefab in seconds. Want to change the mass of all those instances? Adjust the Rigidbody in the Prefab only once. Want to use a different Material for all the instances? Drag the Material onto the Prefab only once. Want to change friction? Use a different Physic Material in the Prefab's collider. Want to add a Particle System to all those boxes? Add a child to the Prefab only once.
但是因为是使用预置物体,可以快速调节预置,想要改变所有实例的质量?仅需在预置上调节一次;想要所有实例使用不同的材质?仅需拖拽材质到预置上一次;想要改变摩擦力?在预置的碰撞器使用不同的物体材质;想要为那些立方体添加一个粒子系统?只需要为预置添加一个子物体一次。
Instantiating rockets & explosions 实例火箭和爆炸
Here's how Prefabs fit into this scenario:
在这种情况下如何预置:
- A rocket launcher instantiates a rocket Prefab when the user presses fire. The Prefab contains a mesh, Rigidbody, Collider, and a child GameObject that contains a trail particle system.
当用户按下开火时,火箭发射器实例一个火箭预置物体。预置物体包含一个网格、刚体、碰撞器和一个子游戏物体包含的粒子系统拖尾。 - The rocket impacts and instantiates an explosion Prefab. The explosion Prefab contains a Particle System, a light that fades out over time, and a script that applies damage to surrounding GameObjects.
火箭撞击后,实例一个爆炸预置。这个爆炸预置包含一个粒子系统,一个随时间推移淡出的光源,和一个将破坏施加到周围游戏物体上的脚本。
While it would be possible to build a rocket GameObject completely from code, adding Components manually and setting properties, it is far easier to instantiate a Prefab. You can instantiate the rocket in just one line of code, no matter how complex the rocket's Prefab is. After instantiating the Prefab you can also modify any properties of the instantiated object (e.g. you can set the velocity of the rocket's Rigidbody).
可能完全从代码创建一个火箭游戏物体,手工添加组件并设置属性,相对还是实例预置物体更简单,可以仅用一行代码示例火箭,不管火箭的实例多么复杂。在实例预置物体后,还可以修改实例物体的任意属性(例如设置火箭刚体的速度)。
Aside from being easier to use, you can update the prefab later on. So if you are building a rocket, you don't immediately have to add a Particle trail to it. You can do that later. As soon as you add the trail as a child GameObject to the Prefab, all your instantiated rockets will have particle trails. And lastly, you can quickly tweak the properties of the rocket Prefab in the Inspector, making it far easier to fine-tune your game. 、
除了很容易使用以为,还能继续更新预置物体。因此,创建火箭之后,不必立即给它添加粒子拖尾,可以以后在添加。当你添加拖尾作为子物体添加给预置,所有实例的火箭将都有粒子拖尾。最后,可以在检视面板快捷的调节火箭预置的属性,从而非常容易的微调游戏。
This script shows how to launch a rocket using the Instantiate() function.
这个脚本显示怎样使用Instantiate()函数反射火箭。
// Require the rocket to be a rigidbody.
//要求火箭是一个刚体
// This way we the user can not assign a prefab without rigidbody
//此脚本不能赋给没有刚体的预置
var rocket : Rigidbody;
var speed = 10.0;

function FireRocket () {
    var rocketClone : Rigidbody = Instantiate(rocket, transform.position, transform.rotation);
    rocketClone.velocity = transform.forward * speed;
    // You can also acccess other components / scripts of the clone
	//也可以访问克隆的其他组件或脚本
    rocketClone.GetComponent(MyRocketScript).DoSomething();
}

// Calls the fire method when holding down ctrl or mouse
//当按下ctrl或鼠标,调用开火方法
function Update () {
    if (Input.GetButtonDown("Fire1")) {
        FireRocket();
    }
}
Replacing a character with a ragdoll or wreck 用布娃娃或破坏物替换角色
Let's say you have a fully rigged enemy character and he dies. You could simply play a death animation on the character and disable all scripts that usually handle the enemy logic. You probably have to take care of removing several scripts, adding some custom logic to make sure that no one will continue attacking the dead enemy anymore, and other cleanup tasks.
假设你有一个完全绑定的敌人角色并死亡。可以简单播放一段角色死亡动画并禁用通常控制敌人逻辑的所有脚本,你需要小心的删除一些脚本,再添加一些自定义逻辑,确保不能在攻击死亡的角色,并且需求进行一些其他的清理工作。
A far better approach is to immediately delete the entire character and replace it with an instantiated wrecked prefab. This gives you a lot of flexibility. You could use a different material for the dead character, attach completely different scripts, spawn a Prefab containing the object broken into many pieces to simulate a shattered enemy, or simply instantiate a Prefab containing a version of the character.
目前比较好的办法是立即删除整个角色,并使用准备好的"破坏物"预设实例替换。这给你一个很大的灵活性,可以使用不同的材质用于死亡角色,附加完全不同的脚本,创建的预置包含物体被破坏为许多碎片来模拟消灭的敌人,或简单的实例一个预置包含另一个版本的角色。
Any of these options can be achieved with a single call to Instantiate(), you just have to hook it up to the right prefab and you're set!
这些操作可以通过单一调用Instantiate()可以实现,只要挂载到正确的预置物体即可。
The important part to remember is that the wreck which you Instantiate() can be made of completely different objects than the original. For example, if you have an airplane, you would model two versions. One where the plane consists of a single GameObject with Mesh Renderer and scripts for airplane physics. By keeping the model in just one GameObject, your game will run faster since you will be able to make the model with less triangles and since it consists of fewer objects it will render faster than using many small parts. Also while your plane is happily flying around there is no reason to have it in separate parts.
需要注意的是,用来实例化的"破坏物"可以说完全不同的物体,而不是原始物体。例如,如果有架飞机,要准备两个版本的模型,其中一个飞机包含单个游戏物体带有网格渲染器和飞机物理学的脚本。仅在一个游戏物体保持这个模型,这将使游戏运行更快,因为可以制作模型用更少的三角形面,包含的面减少,因此渲染就会比那些包含更多小小部件的更快。另外,当飞机在良好飞行的时候也没有理由去分割成更多小部分件。
To build a wrecked airplane Prefab, the typical steps are:
创建一个破坏的飞机预置,一般步骤是:
- Model your airplane with lots of different parts in your favorite modeler
在你喜欢的建模软件中,把飞机模型分割成许多不同的部分。 - Create an empty Scene
创建一个空场景 - Drag the model into the empty Scene
拖这个模型到空场景 - Add Rigidbodies to all parts, by selecting all the parts and choosing Component->Physics->Rigidbody
为所有部件添加刚体,选择所有部件并选择菜单Component->Physics->Rigidbody - Add Box Colliders to all parts by selecting all the parts and choosing Component->Physics->Box Collider
为所有部件添加盒碰撞器,选择所有部件并选择菜单Component->Physics->Box Collider - For an extra special effect, add a smoke-like Particle System as a child GameObject to each of the parts
指定额外的特效,添加一个像烟的例子系统,作为每个部件的子游戏物体 - Now you have an airplane with multiple exploded parts, they fall to the ground by physics and will create a Particle trail due to the attached particle system. Hit Play to preview how your model reacts and do any necessary tweaks.
现在有一架具有多个爆炸部件组成的飞机,它们将在物理的作用下坠落到地面附加的粒子系统将作为尾焰特效。点击Play预览模型的反映,并做一些必要的调整。 - Choose Assets->Create Prefab
创建预置物体。 - Drag the root GameObject containing all the airplane parts into the Prefab
拖拽根游戏物体包含所有飞机部件到预置
var wreck : GameObject;

// As an example, we turn the game object into a wreck after 3 seconds automatically
//设定3秒后游戏物体自动变为"破坏物体"
function Start () {
    yield WaitForSeconds(3);
    KillSelf();
}

// Calls the fire method when holding down ctrl or mouse
//按下ctrl或鼠标调用第一个方法
function KillSelf () {
    // Instantiate the wreck game object at the same position we are at
	//在同一位置实例"破坏物"的游戏物体
    var wreckClone = Instantiate(wreck, transform.position, transform.rotation);

    // Sometimes we need to carry over some variables from this object
    // to the wreck
	//有时需要从这个物体上保留一些变量给"破坏物"
    wreckClone.GetComponent(MyScript).someVariable = GetComponent(MyScript).someVariable;

    // Kill ourselves // 销毁自身
    Destroy(gameObject);
}
The First Person Shooter tutorial explains how to replace a character with a ragdoll version and also synchronize limbs with the last state of the animation. You can find that tutorial on the Tutorials page.
第一人称射击游戏教程介绍了如果使用布娃娃系统替换角色,并且四肢也同步动画的最后状态。查看有关教程在Tutorials页面。
Placing a bunch of objects in a specific pattern 在特定的图案放在一堆物体
Lets say you want to place a bunch of objects in a grid or circle pattern. Traditionally this would be done by either:
比方说,想在一个方形或圆形图案中放置一堆物体,传统上是这样的:
- Building an object completely from code. This is tedious! Entering values from a script is both slow, unintuitive and not worth the hassle.
完全从脚本代码创建物体,这是非常乏味的!并且从脚本输出数值非常慢,而且不直观,不值得你去冒这个险。 - Make the fully rigged object, duplicate it and place it multiple times in the scene. This is tedious, and placing objects accurately in a grid is hard.
制作完全绑定的物体,复制并在场景多次替换,这是非常乏味的,并且在表格中准确放置物体是非常困难的。
So use Instantiate() with a Prefab instead! We think you get the idea of why Prefabs are so useful in these scenarios. Here's the code necessary for these scenarios:
因此可以使用Instantiate()实例一个预置物体来替代!为什么预置对于这些方案是很有用的呢,看下面的代码:
// Instantiates a prefab in a circle
//在圆中实例一个预置

var prefab : GameObject;
var numberOfObjects = 20;
var radius = 5;

function Start () {
    for (var i = 0; i < numberOfObjects; i++) {
        var angle = i * Mathf.PI * 2 / numberOfObjects;
        var pos = Vector3 (Mathf.Cos(angle), 0, Mathf.Sin(angle)) * radius;
        Instantiate(prefab, pos, Quaternion.identity);
    }
}
// Instantiates a prefab in a grid
//在矩形栅格内实例化预置

var prefab : GameObject;
var gridX = 5;
var gridY = 5;
var spacing = 2.0;

function Start () {
    for (var y = 0; y < gridY; y++) {
        for (var x=0;x < gridX;x++) {
            var pos = Vector3 (x, 0, y) * spacing;
            Instantiate(prefab, pos, Quaternion.identity);
        }
    }
}
页面最后更新:2010-06-30